Multi-Pages can be thought of as custom pages or blank pages with the added feature of sub-pages. Basically, within a multi-page you can have as many sub-pages as you would like.
This type of page is useful when you want to break up a page into smaller pages. For example, if you own a restaurant, you might create a multi-page named "Menus".
Now you can go to the multi-page and add three sub-pages called, "Breakfast Menu", "Lunch Menu" and "Dinner Menu".
If you're a property lawyer, you might have a multi-page named "Services" then you could add sub-pages titled, "Real Estate Contracts", "Estate Planning" and "Construction Law".

Use Site Admin > Pages tab to rename a multi-page.
Use the "Add Page" link to add a page. In the "Add Page" dialog, enter the title for your page and enter your page text using the editor.

In the editor, you can easily layout text, pictures and other items for your page. Click OK when you ready to post your page to multi-page.

Pages will be listed on the left side, to view a page, simply click the page title. Under each page, you'll find a set of links. Click "Edit" to rename or update this page. "Delete" will delete the page. "Share" is used to let your site members and followers know about this page. Within the "Share" dialog, you can also announce this page on Facebook and Twitter.
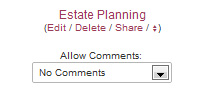
Use the "Allow Comments" drop-down to select if comments are allowed. Select "No Comments" if you don't want comments. "From Anyone" means anyone can post a comment. "After Approval Email" sends the site administrator a confirmation email before a comment is posted. "From Members Only" means only your logged in site members are allowed to post comments.
If you're a property lawyer, you might have a multi-page named "Services" then you could add sub-pages titled, "Real Estate Contracts", "Estate Planning" and "Construction Law".
Use Site Admin > Pages tab to rename a multi-page.
Use the "Add Page" link to add a page. In the "Add Page" dialog, enter the title for your page and enter your page text using the editor.
In the editor, you can easily layout text, pictures and other items for your page. Click OK when you ready to post your page to multi-page.
Pages will be listed on the left side, to view a page, simply click the page title. Under each page, you'll find a set of links. Click "Edit" to rename or update this page. "Delete" will delete the page. "Share" is used to let your site members and followers know about this page. Within the "Share" dialog, you can also announce this page on Facebook and Twitter.
Use the "Allow Comments" drop-down to select if comments are allowed. Select "No Comments" if you don't want comments. "From Anyone" means anyone can post a comment. "After Approval Email" sends the site administrator a confirmation email before a comment is posted. "From Members Only" means only your logged in site members are allowed to post comments.