How To Organize Your Pages And Menu On Your New Website
Create A Website using Easysite, try it free for 30 days, no bank card details needed. Easysite Tutorials Step 1 Sign Up For Free Here. No coding knowledge required when you create a website. The Easysite editor does all the coding automatically. Learn how to organize your pages and menu on your new Easysite website. You will need to login into your site. To login scroll down to the bottom of your site. On the right is a link that says "Login" click that link. Fill in your login details and hit the submit button. You are now in "Admin" see image below. Once you are in "Admin" click the "Pages" button.
Step 4 - Follow all our Easysite Tutorials and build a better website.
How To Make A Website Setting Up Pages And Menu On A Easysite Website
After you login to your Easysite website and click the "Admin" link at the bottom of your site you will be able to hit the "Pages" tab. Below is what you will see, here you will be able to switch pages on or off. Add anchor text and change anchor text on your top menu, and even create members only pages with a few clicks here and there. You can also update the pages SEO.
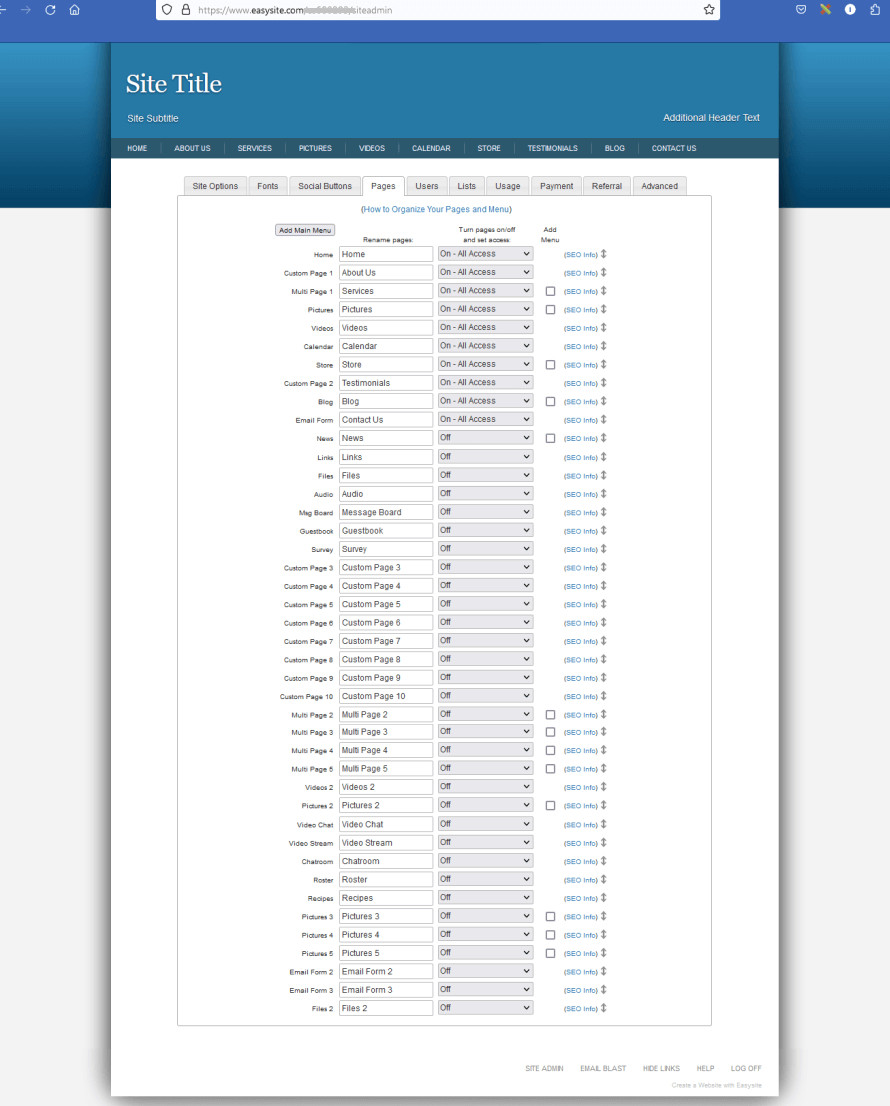
Pages can be renamed. Menu can be renamed. Pages can be on off or set to members only.
Renaming A Page Will Also Change The Text In The Menu
You can rename a page. Look for the heading "Rename Page" go down to the text which you would like to rename and rename to what you want. This will also change the pages name in the menu.
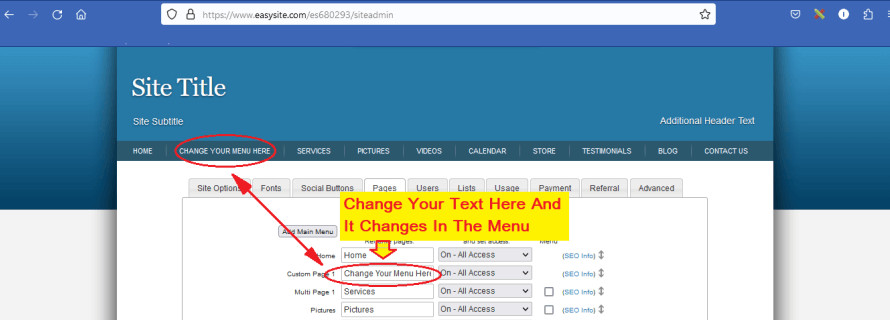
Its easy to create a website using Easysite. Organizing your pages and menu is done from the Pages tab.
How To Switch Pages Off And On And How To Create Members Only Pages
Easysite gives you a large selection of pages that you can use. Some pages are already switched off, its simple to switch pages off and on. As you can see on the below image click the (V) and you can select page "Off" "On - All Access" "On - Members Only".
- OFF - NO ACCESS: When a page is off no one can see it.
- ON - ALL ACCESS: When a page is on everyone can see the page.
- ON - MEMBERS ONLY: When a page is members only, only members that have signed up to your Easysite website will be able to see those pages.
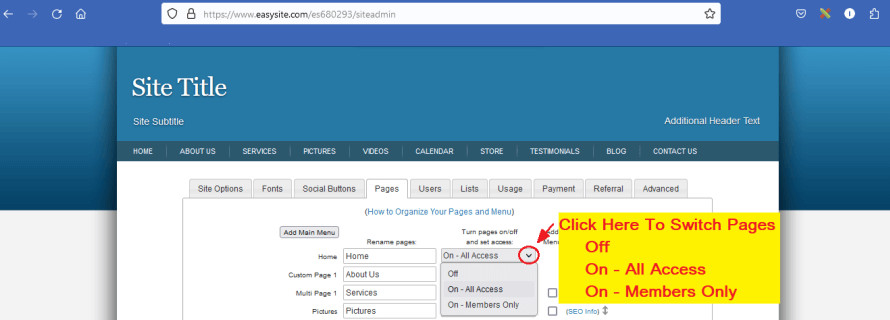
Changing your Menu text can be done from the Pages tab. Once you edit the text in the Pages tab it will change the anchor text in the menu.
SEO - How To Add Your Page Title, Description And Keywords
SEO is important. Giving your page a Title, Description and adding Keywords helps visitors and Google to know what the page is about. Each page needs a Title and Description, clicking the blue SEO info link next to the page you would like to update opens a pop up where you can add the info. You can also edit your SEO when you are working on a page, look for the blue SEO link.
What are Title Tags & Meta Descriptions? Title tags (also known as page titles or SEO titles) and meta descriptions are two HTML tags that live in a page's header. They tell search engines what a page is about and are one of the first things crawlers look at on a page.
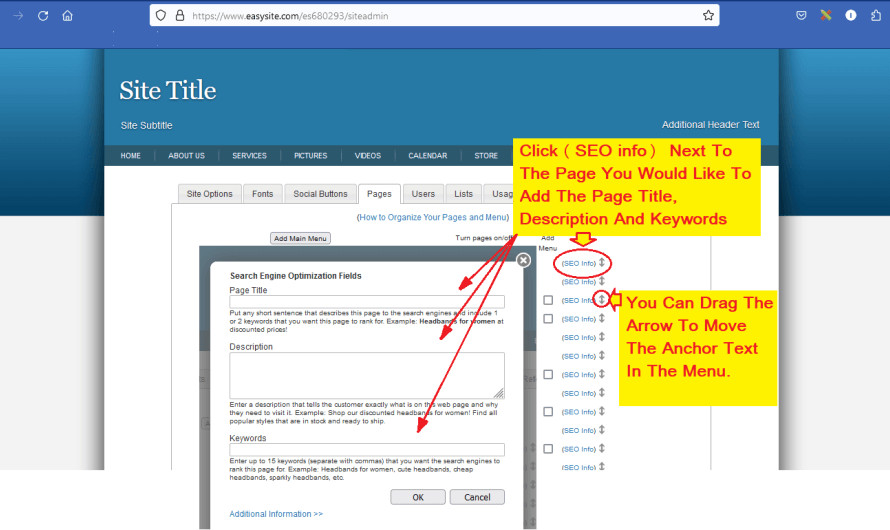
SEO is important when you create a website and would like it to rank on Search Engines. Page Title and Page Description should always have your main keywords for the page and be what the page is about.
The below image is from one of the pages from this site. It shows you what the Title and Description looks like on Google search results. That's why its important to add a Title and Description to each page on your site. The link below is the page that has this Title and Description.
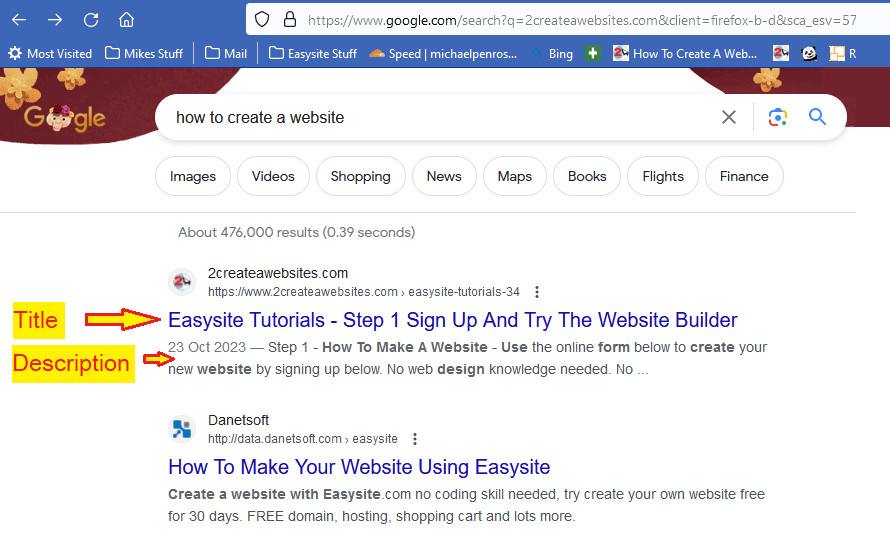
TITLE - A page title helps your SEO it should be around 60-70 characters. Your page title should be long enough to entice the reader, but short enough to make the meaning and purpose of the page clear to both users and search engines.
DESCRIPTION - Meta descriptions can technically be any length, but Google generally truncates snippets to 155-160 characters. It's best to keep meta descriptions long enough that they're sufficiently descriptive, so we recommend descriptions between 50 and 160 characters.
Adding A Menu To A Page
On some of the pages you can add a menu. Use this to create a section on your site all about the same topic. As you can see on this page there are links on the left of the page. This is the menu for this page. If you tick the menu box then as you add more pages on that page each page you add will be added to all the pages. This section is Easysite Tutorials and as I add pages the links will be on each of the pages in the Easysite Tutorials.
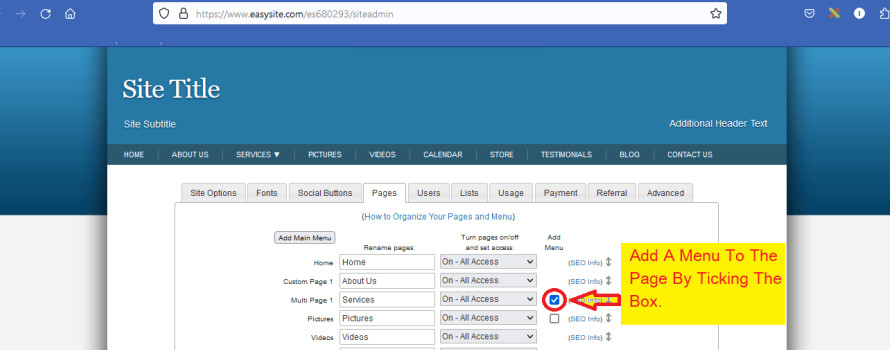
When you use a Multi page you can tick the Add Menu Box in the Pages Admin section. This will create a menu on the left side of the page with anchor text links every time you add a page. This page you are now on is a Multi page with menu. All the Easysite tutorial pages are created using the Multi page and ticking the add menu box. (Step 1 to Step 10 and more)
Easysite tutorials helping you create a website using Easysite.
LIST OF ALL AVAILABLE PAGES ON YOUR EASYSITE WEBSITE
You have complete control on all your pages. Switch pages "Off", "ON" or set all your pages to "MEMBERSHIP". Visitors will have to sign up and become a member to see the pages and content. Renaming the page to the topic of the page can also be done in the "Pages" section. You can also add your "Page Title", "Page Description" and "Keywords" when in the "Pages" section needed for your SEO.
HOME PAGE
HOME - The home page is probably the main page on your site. The Easysite home page of your website has different setting on the editor. Choose the setting that best suites your project. Make sure you home page is full of unique content, at least 1000 to 3000 words about the topic of your project. Also use the Heading tags (H1 use once. H2 to H6 can be used a few times each. Use a heading tag with long tail keywords followed by approximately 300 to 400 words including keywords, then another heading tag followed by another 300 to 400 words about the topic of the site. Continue adding content this way. Include images and links with anchor text to other pages on your site, this will help your SEO.
Home Page Help On Setting Up Your Home Page
Visit learn how to create a websites home page
ABOUT US PAGE
ABOUT US - About us page is exactly that! It should be a page about you, or about your business, about your online shop. You can switch the page on, off, or make it a members only page.
About Us
MULTI PAGES
MULTI PAGES - Multi pages can be thought of as custom pages or blank pages with the added feature of sub-pages. Basically, within a multi-page you can have as many sub-pages as you would like. This type of page is useful when you want to break up a page into smaller pages. For example, like learn how to create a website has this Easysite tutorials section. As you add more pages to the multi page the Title for the page is added in a link to the left of the page, like this page.
PICTURES PAGES
PICTURES - Pictures pages are used to display pictures. Switch your picture page on, look at the menu, click the "Pictures" tab in the menu. You can now upload pictures to the pictures page. It's easy to upload and post pictures.
VIDEO PAGES
VIDEOS - Video pages are used to displayed videos on the video page on your site. If you would like to add videos make sure the video page is switched on. Look for the "Video" tab on the "Menu" and click the tab. You are now ready to upload videos or add a YouTube video.
CALENDAR
CALENDAR - Adding a calendar to your web site and updating your calendar is done in a few clicks. Make sure your calendar page is switched on. Next click the "Calendar" link in the menu and update your calendar.
ONLINE STORE PAGE
ONLINE STORE PAGE - Did you know you get an online store include when you sign up to Easysite, included in the price. Unlike other Ecommerce website builders that need an upgrade to create an online store costing you more. Easysite includes an online store page at no extra cost when you create a website using Easysite. Create online shop is easy using Easysite. You will need to sign up to PayPal as the store page requires a PayPal email to except credit and bank card transactions.
CUSTOM PAGES
CUSTOM PAGES - Think of the custom pages like a blank piece of paper. It's one of the most flexible pages on your site. To use the custom page rename the page and switch the custom page on. Then look at the menu and whatever you renamed the page to click the tab. Now you can add text, images, videos and lots more. Easysite has several custom pages that can be used by switching them on and renaming the page.
BLOG/NEWS PAGES
BLOG/NEWS PAGES - The Blog and News pages lets you create an online journal for your site. These pages are flexible enough to be used as a secondary news or blog pages or an additional multi-page. Entries are listed on the left side, to view an entry, simply click the entry title. Under each entry, you'll find a set of links when you logged in. Click "Edit" to rename or update the text of this entry. "Delete" will delete the entry from your site. "Share" is used to let your site members and followers know about this entry. Within the "Share" dialog, you can also announce this entry on Facebook and Twitter.
Use the "Allow Comments" drop-down to select if comments are allowed. Select "No Comments" if you don't want comments. "From Anyone" means anyone can post a comment. "After Approval Email" sends the site administrator a confirmation email before the comment is posted. "From Members Only" means only your logged in site members can post comments. Visit how to create a websites blog and see what a blog page looks like.
EMAIL FORM PAGES
EMAIL FORM PAGES - The Email Form page lets you add a form that can be filled in by a visitor. Create a questionnaire that visitors to your site can fill out. You might use the email form page as a way to let people contact you, ask a question, request information or sign up for a special promotion. Once a person fills out your email form, you'll receive an email with the information that was entered into the form.
Use the "Add Multiple Choice" link to add a multiple choice question to your email form. Check the "Add text entry." checkbox to provide an entry for users to enter an answer that wasn't one of the choices. For example, you can create a "what's your favorite color" question, then have "red", "green", "blue" as choices, then offer an "other" choice that they can fill out.
LINKS PAGE
LINKS PAGE - It's a good idea to Link to other websites that are the same topic as your site when you learn how to create a website. Linking to other sites that have great content and the topic is the same topic as your site helps your SEO. The links page lets you create a list of links to other web pages. Use this page to link to other related sites that you think might be interesting to your visitors.
FILES PAGE
FILES PAGE - The Files page is used to host files on your site. Use the files page to post Word documents, PDFs, PowerPoint presentations, spread sheets and more.
AUDIO PAGE
AUDIO PAGE - The Audio page is used to host music or audio files. In the "add audio" dialog, enter a title, select your file and optionally add a description. Click OK to post your audio file to your site. To play the audio file, click the title of the file. Under each file is a set of links. Click "Edit" to rename or replace the audio file. "Delete" is used to delete the file from your site. "Share" is used to share your audio post with your site members and followers and announce your post on Facebook and Twitter. Use the up-down arrows to rearrange the files. The "background music" checkbox is used to assign an audio file as your site's background music. Select "Shuffle Background Music" to randomize the playback order of the background music.
Use the "Allow Comments" drop-down to select if comments are allowed. Select "No Comments" if you don't want comments. "From Anyone" means anyone can post a comment. "After Approval Email" sends the site administrator a confirmation email before a comment is posted. "From Members Only" means only your logged in site members can post comments.
MESSAGE BOARD PAGE
MESSAGE BOARD PAGE - The message board is used to exchange messages and carry on conversations on your site. The ability to post to the Message Board is set in the Site Admin > Pages tab. "Off" will turn off the message board page. "All Access" lets anyone access and post to the message board. "Approval Email" lets anyone post to the message board, but new messages from visitors have to be approved before they appear. In this mode, after a visitor posts to the message board, the site administrator will be sent an email to review and approve the new message. "Members Only" means that only logged in site members can access and post to the message board. In this mode, visitors are not able to view or post to the message board.
Enter a title for your message then enter the message. Once a message is posted, members who are set to, will receive an email notification. The message board displays the new message in the list of messages along with the number of replies, who replied last and the date of the last reply. To view a message, simply click on the message row. In the message page, use the "Reply to this Message" link to post a reply to the current message. In each post, there are links to edit and delete the post. If you delete the top-level or beginning message, all reply messages will be deleted as well. Also, members can only edit or delete messages that they have posted. While site administrators can edit or delete any message.
GUEST BOOK PAGE
GUEST BOOK PAGE - The Guestbook page of your site allows visitors to say hello and leave a message. Visitors can enter their name, email address, a note and optionally their phone number. After they click the "Submit" button their guestbook entry will be displayed and you'll receive an email alert if you're settings indicate to send you one. Note that only logged in members can see email addresses and phone numbers for entries. Site administrators can use the "Delete" link of each guestbook entry to remove the entry from the guestbook page.
SURVEY PAGE
SURVEY BOOK PAGE - The Survey page lets you create a questionnaire that visitors to your site can fill out. You might use the Survey page to get feedback about the quality of a service you offer or as a follow-up to ask customers about their experience with your company. It's a great way to get visitors opinions on a topic.
VIDEO CHAT PAGE
VIDEO CHAT PAGE - The Video Chat page is used to host video chats with groups of people. Using your computer's webcam, you can send live video through this page. When other people are on the page, they can also send and receive live video.
VIDEO STREAM (BROADCAST) PAGE
VIDEO STREAM (BROADCAST) PAGE - The Video Broadcast page is used to broadcast video from your site. This page is useful for broadcasting a live event, seminar or training for a group of people to watch remotely on their computers.
CHATROOM PAGE
CHATROOM PAGE - The Chatroom page of your Easysite lets you communicate with your Easysite members in real-time. To get started, select the "Chatroom" link on your Easysite. Any member that is currently in the Chatroom will be listed under the "Currently in Chatroom" heading.
ROSTER PAGE
ROSTER PAGE - The Roster page lets you keep track of family, friends, teammates, students, members of a group or club and/or co-workers using your site.
RECIPES PAGE
RECIPES PAGE - The Recipes page lets your Members post their favorite recipes. Members can also use the page to see recipes that have been posted.
SUMMARY ON HOW TO CREATE A WEBSITE
If you would like to learn how to create a website in a few easy steps then follow this Easysite tutorial and start to create a website using Easysite today.
Follow all our Easysite tutorials and learn how to create your own website using Easysite in a few easy steps.
FREQUENTLY ASKED QUESTIONS:
Easysite Tutorials: Create A Website Using Easysite Website Builder
PUBLISHED: NOVEMBER 01, 2023 - EASYSITE TUTORIALS:
STEP FOUR - HOW TO ORGANIZE YOUR PAGES AND MENU WHEN YOU CREATE A WEBSITE USING EASYSITE.

Author: Michael John |